2020年10月09日 - WebVR・Three.js
Three.jsでラインアニメーション
「JavaScriptで取り組むクリエイティブコーディング パーリンノイズを使いこなせ」を参考に、Three.jsでラインアニメーションを試しました。※Three.jsはr120を使用しています。
Three.jsでラインアニメーション
● ラインを生成
ラインを生成します。
始点と終点の頂点座標を設定し、頂点座標の配列からsetFromPointsを使用して、BufferGeometryを生成してラインを生成します。
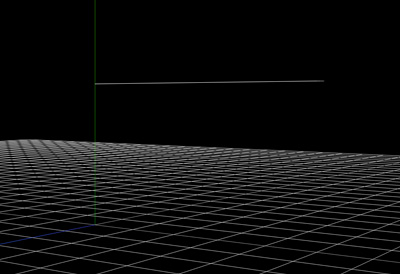
//頂点座標の配列
const points = [];
points.push(new THREE.Vector3(0,3,0));
points.push(new THREE.Vector3(5,3,0));

//頂点座標の配列からBufferGeometryを生成
const geometry = new THREE.BufferGeometry().setFromPoints(points);
const material = new THREE.LineBasicMaterial();
const line = new THREE.Line(geometry,material);
scene.add(line);
● 頂点座標の設定
始点と終点以外の頂点座標も設定します。ラインの長さと分割数は自由に調整できるようにしました。
//ラインの長さ
const lineLength = 10;

//ラインの分割数
const segmentNum = 10;

//頂点座標の配列
const points = [];

//頂点座標を設定
for(let i = 0; i <= segmentNum; i++){
	const x = ((lineLength/segmentNum) * i) - lineLength / 2;
	const y = 3;
	const z = 0;
	const p = new THREE.Vector3(x,y,z);
	points.push(p);
}
● パーリンノイズの設定
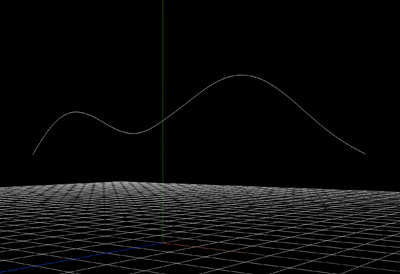
const lineLength = 10;
const segmentNum = 100;

//振り幅
const amplitude = 5;

const points = [];
const time = Date.now() / 4000;

for(let i = 0; i <= segmentNum; i++){
	const x = ((lineLength/segmentNum) * i) - lineLength / 2;

	//Y軸にパーリンノイズを設定
	const px = i / 50;
	const py = time;
	const y =  amplitude * noise.perlin2(px,py) + 3;

	const z = 0;
	const p = new THREE.Vector3(x,y,z);
	points.push(p);
}

const geometry = new THREE.BufferGeometry().setFromPoints(points);
const material = new THREE.LineBasicMaterial();
const line = new THREE.Line(geometry,material);
scene.add(line);
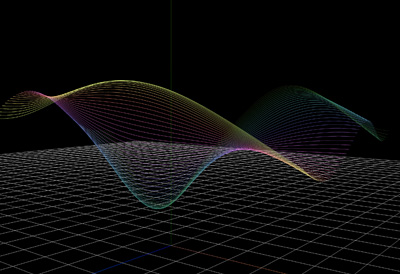
● ライン数の増加
ライン数を増やします。ライン数は自由に調整できるようにしました。
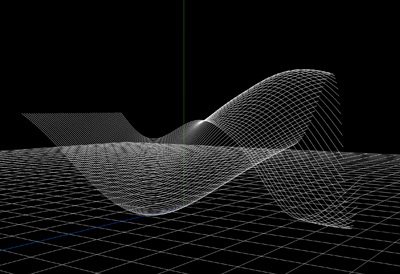
//ライン数
const lineNum = 50;

const lineLength = 10;
const segmentNum = 100;
const amplitude = 5;

const time = Date.now() / 4000;

for(let i = 0; i < lineNum; i++){
	const points = [];

	for(let j = 0; j <= segmentNum; j++){
		const x = ((lineLength/segmentNum) * j) - lineLength / 2;
		const px = j / (50 + i);
		const py = i / 50 + time;
		const y = amplitude * noise.perlin2(px,py) + 3;

		//Z軸を調整
		const z = i * 0.1 - ((lineNum * 0.1) / 2);

		const p = new THREE.Vector3(x,y,z);
		points.push(p);
	}

	const geometry = new THREE.BufferGeometry().setFromPoints(points);
	const material = new THREE.LineBasicMaterial();

	const line = new THREE.Line(geometry,material);
	scene.add(line);
}
● ラインカラーの調整
ラインカラーを調整します。
HSL色空間は、色相(Hue)、彩度(Saturation)、輝度(Lightness)で色を表現し、彩度や輝度で色を調整することができます。
const h = Math.round((i / lineNum) * 360);
const s = 100;
const l = Math.round((i / lineNum) * 100);
const color = new THREE.Color(`hsl(${h},${s}%,${l}%)`);

const material = new THREE.LineBasicMaterial({
	color:color
});
● アニメーション
ラインをアニメーションさせます。
let lineArr = [];
const lineNum = 50;
const lineLength = 10;
const segmentNum = 100;
const amplitude = 5;

for(let i = 0; i < lineNum; i++){
	const points = [];

	for(let j = 0; j <= segmentNum; j++){
		const x = ((lineLength/segmentNum) * j) - lineLength / 2;
		const y = 0;
		const z = i * 0.3 - ((lineNum * 0.3) / 2);;
		const p = new THREE.Vector3(x,y,z);
		points.push(p);
	}

	const geometry = new THREE.BufferGeometry().setFromPoints(points);
	const material = new THREE.LineBasicMaterial();

	const line = new THREE.Line(geometry,material);
	lineArr[i] = line;
	scene.add(lineArr[i]);
}

function rendering(){
	requestAnimationFrame(rendering);

	for(let i = 0; i < lineNum; i++){
		const line = lineArr[i];
		const positions = line.geometry.attributes.position.array;
		const time = Date.now() / 4000;

		for(let j = 0; j <= segmentNum; j++){
			const x = ((lineLength/segmentNum) * j) - lineLength / 2;
			const px = j / (50 + i);
			const py = i / 50 + time;
			const y =  amplitude * noise.perlin2(px,py);
			const z = i * 0.3 - ((lineNum * 0.3) / 2);
			positions[j * 3] = x;
			positions[j * 3 + 1] = y;
			positions[j * 3 + 2 ] = z;
		}

		const h = Math.round((i / lineNum) * 360);
		const s = 100;
		const l = Math.round((i / lineNum) * 100);
		const color = new THREE.Color(`hsl(${h},${s}%,${l}%)`);

		line.material.color = color;

		line.geometry.attributes.position.needsUpdate = true;
	}

	renderer.render(scene,camera);
}

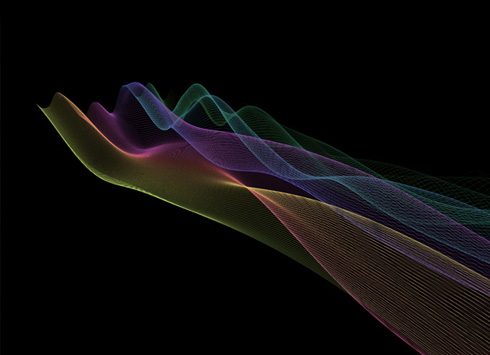
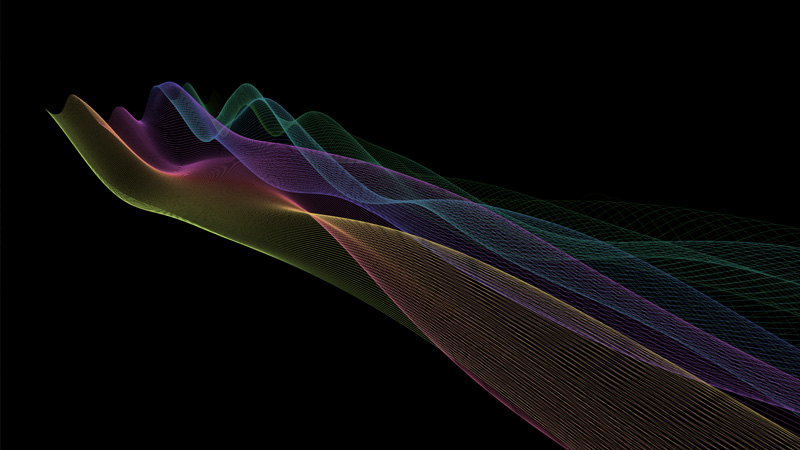
完成したデモになります。ラインの長さやカラー、カメラワークを調整しました。