2021年05月08日 - WebVR・Three.js
Three.jsでポストプロセッシング
「Three.jsでオフスクリーンレンダリング」に続き、Three.jsでポストプロセッシングを試しました。※Three.jsはr128を使用しています。
Three.jsでポストプロセッシング
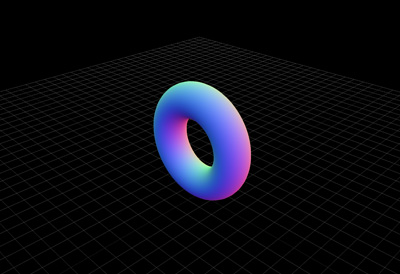
ポストプロセッシングは、スクリーンではなくメモリ上にレンダリングした結果を、ブラウザに全画面表示した平面にテクスチャとしてはり、フィルターやエフェクトをかける手法です。
● 平面をブラウザに全画面表示
「Three.jsでオフスクリーンレンダリング」に続き、スクリーン用の平面をブラウザの全画面に表示します。後でフラグメントシェーダでエフェクトをかけるので、平面のマテリアルはRawShaderMaterialに変更します。
また、オフスクリーンレンダリングの処理は、ポストプロセッシングの処理と一緒に関数にまとめます。
let postprocessing;

setPostprocessing();
threeWorld();
rendering();

//ポストプロセッシング
function setPostprocessing(){

	//スクリーン用の平面
	const geometry = new THREE.PlaneGeometry(2,2);
	const material = new THREE.RawShaderMaterial({
		uniforms:{
			texture:{type:'t',value:null}
		},
		vertexShader:vertexShader,
		fragmentShader:fragmentShader,
		depthTest:false,
	});
	const plane = new THREE.Mesh(geometry,material);
	scene.add(plane);

	//ポストプロセッシング管理用オブジェクト
	postprocessing = {
		scene: new THREE.Scene(),
		camera: new THREE.PerspectiveCamera(50,window.innerWidth/window.innerHeight,1,100),
		renderTarget: new THREE.WebGLRenderTarget(
			window.innerWidth * window.devicePixelRatio,
			window.innerHeight * window.devicePixelRatio,
		)
	}

	//テクスチャを設定
	plane.material.uniforms.texture.value = postprocessing.renderTarget.texture;

	//カメラの調整
	postprocessing.camera.position.set(15,15,15);
	postprocessing.camera.lookAt(new THREE.Vector3(0,0,0));

 	//ウィンドウのリサイズ処理
 	window.addEventListener('resize',function(){

		//ポストプロセッシング用のカメラを調整
		postprocessing.camera.aspect = window.innerWidth/window.innerHeight;
		postprocessing.camera.updateProjectionMatrix();
	},false);
}

function threeWorld(){
	renderer.outputEncoding = THREE.sRGBEncoding;

	const gridHelper = new THREE.GridHelper(50,50);
	postprocessing.scene.add(gridHelper);

	//トーラス
	const geometry = new THREE.TorusGeometry(2.5,1,32,100);
	const material = new THREE.MeshNormalMaterial();
	const torus = new THREE.Mesh(geometry,material);
	torus.position.set(0,3.5,0);
	postprocessing.scene.add(torus);
}

function rendering(){
	requestAnimationFrame(rendering);

	//オフスクリーンレンダリング
	renderer.setRenderTarget(postprocessing.renderTarget);
	renderer.render(postprocessing.scene,postprocessing.camera);
	renderer.setRenderTarget(null);

	//レンダリング
	renderer.render(scene,camera);
}
● glsl.js
バーテックスシェーダーでgl_Positionにpositionを渡します。平面の大きさを2x2にすると、左下が(-1,-1,0)、右上が(1,1,0)となりクリッピング空間に一致するため、ブラウザに全画面表示させることができます。
const vertexShader =`
	attribute vec3 position;
	attribute vec2 uv;

	varying vec2 vUv;

	void main(void){
		vUv = uv;
		gl_Position = vec4(position,1.0);
	}
`;

const fragmentShader =`
	precision highp float;

	uniform sampler2D texture;
	varying vec2 vUv;

	void main(void){
		vec4 texel = texture2D(texture,vUv);
		gl_FragColor = texel;
	}
`;

export { vertexShader, fragmentShader };
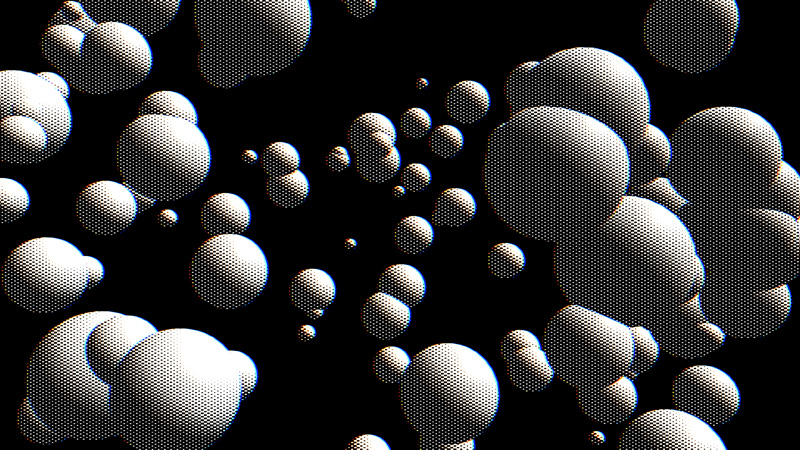
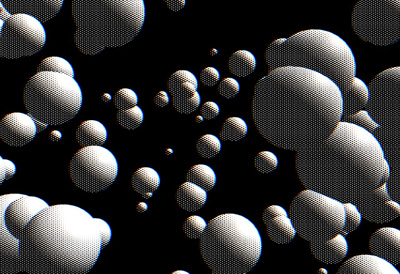
● ドットスクリーンエフェクト
トーラスを球体に変更してアニメーションさせ、「postprocessing - three.js docs」を参考に、ドットスクリーンエフェクトをかけます。
エフェクトのシェーダは「examples > jsm > shaders > DotScreenShader.js」と、同じ場所にある「RGBShiftShader.js」を参考にしました。
● glsl.js
const vertexShader =`
	attribute vec3 position;
    attribute vec2 uv;

	varying vec2 vUv;

	void main(void){
		vUv = uv;
		gl_Position = vec4(position,1.0);
	}
`;

const fragmentShader =`
	precision highp float;

	uniform sampler2D texture;
	varying vec2 vUv;

	vec2 center = vec2(0.5,0.5);
	float angle = 1.57;
	float scale = 4.0;
	vec2 tSize = vec2(256,256);
	float amount = 0.0015;

	//パターン生成
	float pattern(){
		float s = sin(angle);
		float c = cos(angle);
		vec2 tex = vUv * tSize - center;
		vec2 point = vec2(c * tex.x - s * tex.y, s * tex.x + c * tex.y) * scale;
		return (sin(point.x) * sin(point.y)) * 4.0;
	}

    void main(void){
        vec4 texel = texture2D(texture,vUv);

       	//色収差
       	vec2 offset = amount * vec2(cos(0.0),sin(0.0));
		vec4 cr = texture2D(texture,vUv + offset);
		vec4 cga = texture2D(texture,vUv);
		vec4 cb = texture2D(texture,vUv - offset);

		vec3 color = vec3(cr.r, cga.g, cb.b);

		//ドットスクリーンエフェクトを描画
		gl_FragColor = vec4(vec3(color * 10.0 - 5.0 + pattern()),1.0);
	}
`;

export { vertexShader, fragmentShader };
● script.js
必要なライブラリを読み込みます。
<script src="js/preloadjs.min.js"></script>
<script src="js/TweenMax.min.js"></script>
<script src="js/script.js" type="module"></script>
完成したscript.jsになります。
//===============================================================
// Import Library
//===============================================================
import * as THREE from './lib/three_jsm/three.module.js';
import { OrbitControls } from './lib/three_jsm/OrbitControls.js';
import { scene, camera, container, renderer } from './lib/basescene.js';
import { vertexShader, fragmentShader } from './glsl.js';

//===============================================================
// Init
//===============================================================
window.addEventListener('load',function(){
   init();
});

let orbitControls;
let postprocessing;
let sphereContainer;
let directionalLight;
let time = 0;

function init(){
	setLoading();
}

function setLoading(){
	TweenMax.to('.loader',0.1,{opacity:1});
	TweenMax.to('#loader_wrapper',1,{
        opacity:0,
        delay:1,
        onComplete: function(){
            document.getElementById('loader_wrapper').style.display = 'none';
            TweenMax.to('.loader',0,{opacity:0});
        }
    });
    setPostprocessing();
	threeWorld();
	setLight();
	setControll();
	rendering();
}

function setPostprocessing(){
	const geometry = new THREE.PlaneGeometry(2,2);
	const material = new THREE.RawShaderMaterial({
		uniforms:{
			texture:{type:'t',value:null}
		},
		vertexShader:vertexShader,
    	fragmentShader:fragmentShader,
    	depthTest:false,
	});
	const plane = new THREE.Mesh(geometry,material);
	scene.add(plane);

	postprocessing = {
		scene: new THREE.Scene(),
		camera: new THREE.PerspectiveCamera(50,window.innerWidth/window.innerHeight,1,100),
		renderTarget: new THREE.WebGLRenderTarget(
			window.innerWidth * window.devicePixelRatio,
			window.innerHeight * window.devicePixelRatio,
		)
	}
	plane.material.uniforms.texture.value = postprocessing.renderTarget.texture;
	postprocessing.camera.position.set(0,20,20);

 	window.addEventListener('resize',function(){
		postprocessing.camera.aspect = window.innerWidth/window.innerHeight;
		postprocessing.camera.updateProjectionMatrix();
	},false);
}
//===============================================================
// Create World
//===============================================================
function threeWorld(){
	renderer.outputEncoding = THREE.sRGBEncoding;

	const geometry = new THREE.SphereGeometry(2,32,32);
	const material = new THREE.MeshPhongMaterial();
	const sphere = new THREE.Mesh(geometry,material);

	sphereContainer = new THREE.Object3D();
	postprocessing.scene.add(sphereContainer);

	for(let i = 0; i < 150; i++){
		const sphere = new THREE.Mesh(geometry,material);
		const radian = (Math.random() * 360) * Math.PI / 180;
		const radian2 = (Math.random() * 360) * Math.PI / 180;
		const x = Math.cos(radian) * Math.cos(radian2) * 15;
		const y = Math.sin(radian) * 15;
		const z = Math.cos(radian) * Math.sin(radian2) * 15;
		const scale = Math.random() * 0.7 + 0.15;
		sphere.position.set(x,y,z);
		sphere.scale.set(scale,scale,scale);
		sphereContainer.add(sphere)
	}
}

function setLight(){
	const ambientlight = new THREE.AmbientLight(0xFFFFFF,0.3);
	postprocessing.scene.add(ambientlight);

	directionalLight = new THREE.DirectionalLight(0XFFFFFF,0.8);
	postprocessing.scene.add(directionalLight);
}

function setControll(){
	document.addEventListener('touchmove',function(e){e.preventDefault();},{passive:false});
	orbitControls = new OrbitControls(postprocessing.camera,renderer.domElement);
	orbitControls.enableDamping = true;
	orbitControls.dampingFactor = 0.5;
}

function rendering(){
	requestAnimationFrame(rendering);

	if(orbitControls){
		orbitControls.update();
	}

	time++;
	sphereContainer.rotation.x = time * 0.1 * Math.PI / 180;
	sphereContainer.rotation.y = time * 0.1 * Math.PI / 180;

	const radian = time * 0.2 * Math.PI / 180;
	const radian2 = time * 0.2 * Math.PI / 180;
	directionalLight.position.x = Math.cos(radian) * Math.cos(radian2) * 10;
	directionalLight.position.y = Math.sin(radian) * 10;
	directionalLight.position.z = Math.cos(radian) * Math.sin(radian2) * 10;

	renderer.setRenderTarget(postprocessing.renderTarget);
	renderer.render(postprocessing.scene,postprocessing.camera);
	renderer.setRenderTarget(null);

	renderer.render(scene,camera);
}
● basescene.js
sceneやcameraなど基本的な設定を管理するbasescene.jsです。
//===============================================================
// Import Library
//===============================================================
import * as THREE from './three_jsm/three.module.js';

//===============================================================
// Base scene
//===============================================================
let scene,camera,container,renderer;

init();

function init(){
	scene = new THREE.Scene();
	camera = new THREE.PerspectiveCamera(50,window.innerWidth/window.innerHeight,1,10);
	//camera.position.set(0,0,0);
	scene.add(camera);

	renderer = new THREE.WebGLRenderer({antialias:true});
	renderer.setPixelRatio(window.devicePixelRatio);
	renderer.setSize(window.innerWidth,window.innerHeight);
	renderer.setClearColor(new THREE.Color(0x000000));

	container = document.querySelector('#canvas_vr');
	container.appendChild(renderer.domElement);

	window.addEventListener('resize',function(){
		camera.aspect = window.innerWidth/window.innerHeight;
		camera.updateProjectionMatrix();
		renderer.setSize(window.innerWidth,window.innerHeight);
	},false);
}

export { scene, camera, container, renderer }
● glsl.js
ドットスクリーンエフェクトをかけるglsl.jsです。
const vertexShader =`
	attribute vec3 position;
    attribute vec2 uv;

	varying vec2 vUv;

	void main(void){
		vUv = uv;
		gl_Position = vec4(position,1.0);
	}
`;

const fragmentShader =`
	precision highp float;

	uniform sampler2D texture;
	varying vec2 vUv;

	vec2 center = vec2(0.5,0.5);
	float angle = 1.57;
	float scale = 4.0;
	vec2 tSize = vec2(256,256);
	float amount = 0.0015;

	float pattern(){
		float s = sin(angle);
		float c = cos(angle);
		vec2 tex = vUv * tSize - center;
		vec2 point = vec2(c * tex.x - s * tex.y, s * tex.x + c * tex.y) * scale;
		return (sin(point.x) * sin(point.y)) * 4.0;
	}

    void main(void){
        vec4 texel = texture2D(texture,vUv);

       	vec2 offset = amount * vec2(cos(0.0),sin(0.0));
		vec4 cr = texture2D(texture,vUv + offset);
		vec4 cga = texture2D(texture,vUv);
		vec4 cb = texture2D(texture,vUv - offset);

		vec3 color = vec3(cr.r, cga.g, cb.b);

		gl_FragColor = vec4(vec3(color * 10.0 - 5.0 + pattern()),1.0);
	}
`;

export { vertexShader, fragmentShader };

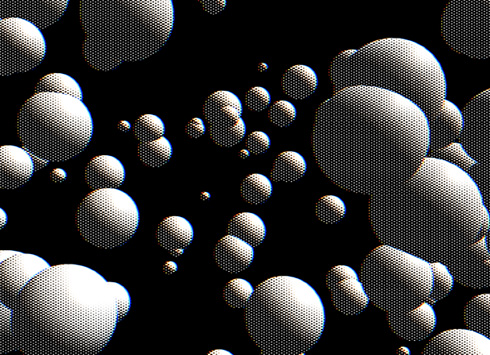
完成したデモになります。Three.jsでポストプロセッシングを試しました。