Three.jsでカメラアニメーション
「WebGL開発に役立つベクトルの足し算・引き算 (Three.js編)」を参考に、オブジェクトを追従するカメラアニメーションを試しました。※Three.jsはr124を使用しています。
Three.jsのベクトル
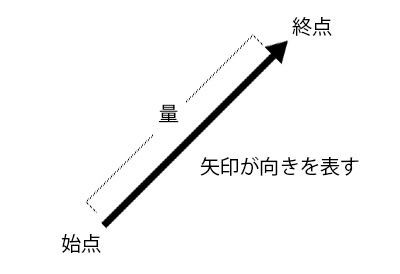
ベクトルは「向き」と「量」の2つの情報を持ち、始点と終点の2つの座標を矢印で結んで表現します。その矢印がベクトルの向きを、長さが量を表します。
ベクトルは(X,Y,Z)と表記しますが、この場合の始点は原点(0,0,0)です。また、量(大きさ)がちょうど1のベクトルのことを単位ベクトルと言います。
Three.jsのベクトルはVector3で設定し、表示したい場合はArrowHelperを使用します。
ArrowHelperの第一引数は単位ベクトルなので、ベクトルはnormalizeで単位ベクトルにします。
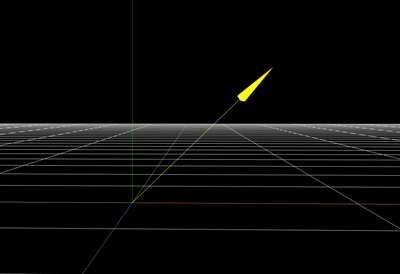
//ベクトル
const vector = new THREE.Vector3(1,1,1);

//単位ベクトルに変換
vector.normalize();

const arrowHelper = new THREE.ArrowHelper(

	//単位ベクトル
	vector,

	//始点
	new THREE.Vector3(0,0,0),

	//ベクトルの大きさ
	10,
);
scene.add(arrowHelper);
オブジェクトを追従するカメラアニメーション
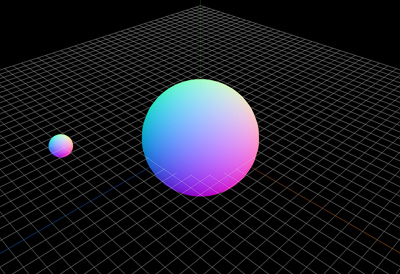
● 球体を円形にアニメーション
「Three.jsで螺旋アニメーション」でやったように、三角関数を使用して、球体を円形にアニメーションさせます。
マテリアルは、動作確認のためライティングを必要としないMeshNormalMaterialを使用し、アニメーションさせる球体は、管理しやすいように球体クラスを作成します。
let degree = 0;
let phisics;

const axesHelper = new THREE.AxesHelper(500);
const gridHelper = new THREE.GridHelper(500,50);
scene.add(axesHelper);
scene.add(gridHelper);

//中央の球体
const geometry = new THREE.SphereGeometry(50,32,32);
const material = new THREE.MeshNormalMaterial();
const sphere = new THREE.Mesh(geometry,material);
scene.add(sphere);

//アニメーションさせる球体
phisics = new PhisicsSphere();
scene.add(phisics.obj);

function rendering(){
	requestAnimationFrame(rendering);

	//アニメーション
	degree += 0.2;
	phisics.update(degree);

	renderer.render(scene,camera);
}

//アニメーション用の球体クラス
class PhisicsSphere{
	constructor(mesh){
		const geometry = new THREE.SphereGeometry(10,32,32);
		const material = new THREE.MeshNormalMaterial();
		this.obj = new THREE.Mesh(geometry,material);
		this.radius = 120;
		this.degree = 0;
	}

	update(degree){
		this.degree = degree;
		this.updatePosition();
	}

	updatePosition(){
		//球体の座標を設定
		const rad = this.degree * Math.PI / 180;
		const x = Math.cos(rad) * this.radius;
		const y = Math.sin(rad * 1.5) / 7  * this.radius;;
		const z = Math.sin(rad) * this.radius;
		this.obj.position.set(x,y,z);
	}
}
● 球体の正面ベクトル
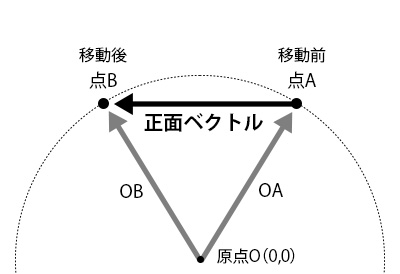
球体の移動方向を表す正面ベクトルを求めます。ベクトルは足したり引いたりでき、移動後のベクトルから移動前のベクトルを引くことで正面ベクトルを求めることができます。求めた正面ベクトルをArrowHelperで表示します。
let degree = 0;
let phisics;
let oldPos,newPos,frontVector,backVector;
let arrowHelper;

const axesHelper = new THREE.AxesHelper(500);
const gridHelper = new THREE.GridHelper(500,50);
scene.add(axesHelper);
scene.add(gridHelper);

const geometry = new THREE.SphereGeometry(50,32,32);
const material = new THREE.MeshNormalMaterial();
const sphere = new THREE.Mesh(geometry,material);
scene.add(sphere);

phisics = new PhisicsSphere();
scene.add(phisics.obj);

//矢印を表示
arrowHelper = new THREE.ArrowHelper(
	frontVector,
	new THREE.Vector3(0,0,0),
	30
);
phisics.obj.add(arrowHelper);

function rendering(){
	requestAnimationFrame(rendering);

	//アニメーション
	degree += 0.2;

	//移動前のベクトルを取得
	oldPos = phisics.obj.position.clone();

	//移動
	phisics.update(degree);

	//移動前のベクトルを取得
	newPos = phisics.obj.position.clone();

	//正面ベクトル
	frontVector = newPos.clone().sub(oldPos.clone());

	//単位ベクトルに変換
	frontVector.normalize();

	arrowHelper.setDirection(frontVector);

	renderer.render(scene,camera);
}

class PhisicsSphere{
	constructor(mesh){
		const geometry = new THREE.SphereGeometry(10,32,32);
		const material = new THREE.MeshNormalMaterial();
		this.obj = new THREE.Mesh(geometry,material);
		this.radius = 120;
		this.degree = 0;
	}

	update(degree){
		this.degree = degree;
		this.updatePosition();
	}

	updatePosition(){
		const rad = this.degree * Math.PI / 180;
		const x = Math.cos(rad) * this.radius;
		const y = Math.sin(rad * 1.5) / 7  * this.radius;;
		const z = Math.sin(rad) * this.radius;
		this.obj.position.set(x,y,z);
	}
}
● カメラを球体に追従
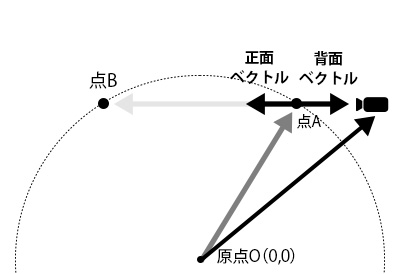

カメラを球体に追従させます。球体の正面ベクトルの逆ベクトル、背面ベクトルをnegateで求めます。正面ベクトルは単位ベクトルに変換済みで、その逆ベクトルである背面ベクトルも単位ベクトルなので、multiplyScalarで球体とカメラの距離を設定し、カメラの座標に反映します。
function rendering(){
	requestAnimationFrame(rendering);

	degree += 0.2;

	oldPos = phisics.obj.position.clone();
	phisics.update(degree);
	newPos = phisics.obj.position.clone();

	frontVector = newPos.clone().sub(oldPos.clone());
	frontVector.normalize();
	arrowHelper.setDirection(frontVector);

	//球体とカメラの距離
	const distance = 175;

	//背面ベクトル
	backVector = frontVector.clone().negate();
	backVector.multiplyScalar(distance);

	//背面ベクトルを使用してカメラの座標を設定
	const cameraPosition = backVector.add(phisics.obj.position);
	camera.position.copy(cameraPosition);
	camera.lookAt(phisics.obj.position);

	renderer.render(scene,camera);
}
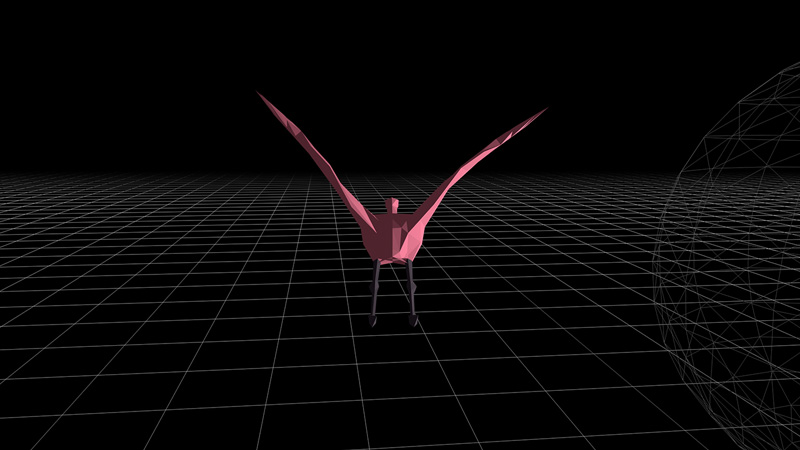
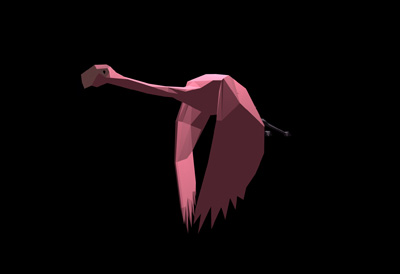
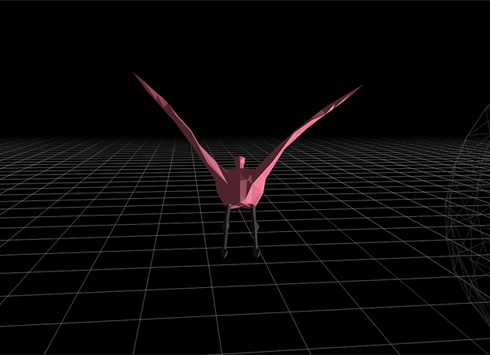
● glTFの読み込み
球体だと面白くないので、「Three.js」の中の「examples > model > gltf > Flamingo.glb」を読み込み、アニメーションさせます。
また、Quaternionを使用してフラミングの姿勢を設定します。
const loader = new GLTFLoader();

loader.load('../data/Flamingo.glb',function(gltf){

	//メッシュを取得
	birdMesh = gltf.scene.children[0];

	//メッシュのサイズを調整
	birdMesh.scale.set(0.6,0.6,0.6);

	//シャドウの設定
	birdMesh.castShadow = true;
	birdMesh.receiveShadow = true;

	//アニメーションの設定
	const mixer = new THREE.AnimationMixer(birdMesh);
	mixer.clipAction(gltf.animations[0]).setDuration(1).play();
	mixers.push(mixer);
});
● script.js
必要なライブラリを読み込みます。
<script src="js/preloadjs.min.js"></script>
<script src="js/TweenMax.min.js"></script>
<script src="js/script.js" type="module"></script>
完成したscript.jsになります。
//===============================================================
// Import Library
//===============================================================
import * as THREE from './lib/three_jsm/three.module.js';
import { scene, camera, container, renderer } from './lib/basescene.js';
import { GLTFLoader } from './lib/three_jsm/GLTFLoader.js';

//===============================================================
// Init
//===============================================================
window.addEventListener('load',function(){
   init();
});

let degree = 0;
let mixers = [];
let birdMesh,bird;
let oldPos,newPos,frontVector,backVector;
const clock = new THREE.Clock();

function init(){
	setLoading();
}

function setLoading(){
	TweenMax.to('.loader',0.1,{opacity:1});

	const loader = new GLTFLoader();

	loader.load('../data/Flamingo.glb',function(gltf){
		birdMesh = gltf.scene.children[0];
		birdMesh.scale.set(0.6,0.6,0.6);

		birdMesh.castShadow = true;
		birdMesh.receiveShadow = true;

		const mixer = new THREE.AnimationMixer(birdMesh);
		mixer.clipAction(gltf.animations[0]).setDuration(1).play();
		mixers.push(mixer);

		TweenMax.to('#loader_wrapper',1,{
	        opacity:0,
	        delay:0,
	        onComplete: function(){
	            document.getElementById('loader_wrapper').style.display = 'none';
	            TweenMax.to('.loader',0,{opacity:0});
	        }
	    });

		threeWorld();
		setLight();
		rendering();
	});
}

//===============================================================
// Create World
//===============================================================
function threeWorld(){
	renderer.outputEncoding = THREE.sRGBEncoding;

	scene.fog = new THREE.Fog(0x000000, 1000, 2000);

	const gridHelper = new THREE.GridHelper(5000,100);
	gridHelper.position.set(0,-100,0);
	scene.add(gridHelper);

	const geometry = new THREE.SphereGeometry(70,16,16);
	const material = new THREE.MeshStandardMaterial({
		color:0xFFFFFF,
		wireframe:true,
	});
	const sphere = new THREE.Mesh(geometry,material);
	scene.add(sphere);

	bird = new Bird(birdMesh);
	scene.add(bird.obj);
}

function setLight(){
	const ambientlight = new THREE.AmbientLight(0xFFFFFF,0.1);
	scene.add(ambientlight);

	const pointLight = new THREE.PointLight(0xFFFFFF,3,250);
	scene.add(pointLight);
}

function rendering(){
	requestAnimationFrame(rendering);

	degree += 0.2;

	oldPos = bird.obj.position.clone();
	bird.update(degree);
	newPos = bird.obj.position.clone();

	frontVector = newPos.clone().sub(oldPos.clone());
	frontVector.normalize();

	const distance = 175;

	backVector = frontVector.clone().negate();
	backVector.multiplyScalar(distance);

	const cameraPosition = backVector.add(bird.obj.position);
	camera.position.copy(cameraPosition);
	camera.lookAt(bird.obj.position);

	const delta = clock.getDelta();

	for (let i = 0; i < mixers.length; i++) {
		mixers[i].update(delta);
	}

	renderer.render(scene,camera);
}

class Bird{
	constructor(mesh){
		this.obj = mesh;
		this.radius = 150;
		this.degree = 0;
	}

	update(degree){
		this.degree = degree;
		this.updatePosition();
		this.updateQuaternion();
	}

	updatePosition(){
		const rad = this.degree * Math.PI / 180;
		const x = Math.cos(rad) * this.radius;
		const y = Math.sin(rad * 1.5) / 7  * this.radius;;
		const z = Math.sin(rad) * this.radius;
		this.obj.position.set(x,y,z);
	}

	updateQuaternion(){
		const axis = new THREE.Vector3(0,1,0).normalize();
		const angle = -this.degree * Math.PI / 180;
		const q = new THREE.Quaternion();
		q.setFromAxisAngle(axis,angle);
		this.obj.quaternion.copy(q);
	}
}

完成したデモになります。カメラワークを工夫することで、いろいろと面白いコンテンツが制作できそうです。