Three.jsでコントローラーを制御
「Three.jsでコントローラーを取得」でコントローラーの取得方法を調べましたが、WebVRコンテンツの空間を自由に動きたいと思い、Three.jsでコントローラーを制御する方法を調べました。
Three.jsでコントローラーを制御
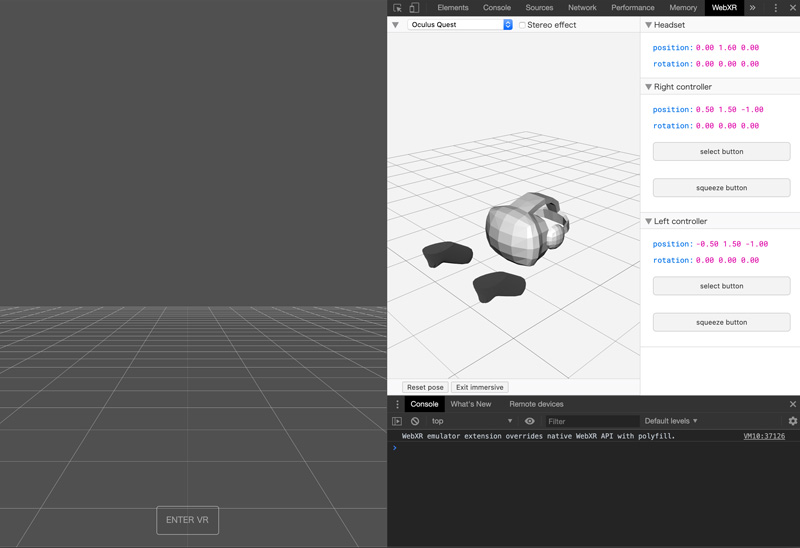
● WebXR API Emulator
WebVRコンテンツの制作は、エミュレーターでデバイスの動作確認ができたり、Consoleでデバッグできるので、WebXR API Emulatorを使用すると便利です。

● WebXRManager
Three.jsのWebXRManagerは、WebXR Device APIのデバイスや接続情報を管理するクラスで、オブジェクトはrenderer.xrのプロパティに保持されます。また、WebXRManagerには、XRレンダリングの有効化やコントローラーの取得など、XRに関連するタスクを実行する機能もあります。
● getControllerとgetControllerGrip
WebXRManagerにはgetControllerとgetControllerGripと、コントローラーに関する2つのメソッドがあります。getControllerは、TRHEE.Groupのオブジェクトを返し、光線を設置するのに使います。
//右側の光線
const controller1 = renderer.xr.getController(0);
controller1.addEventListener('connected',function(event){
	this.add(buildController(event.data));
});
scene.add(controller1);

//左側の光線
const controller2 = renderer.xr.getController(1);
controller2.addEventListener('connected',function(event){
	this.add(buildController(event.data));
});
scene.add(controller2);

//光線の生成
function buildController(data){

	//ターゲットレイモードの判定
	switch(data.targetRayMode){

		case 'tracked-pointer':
			const geometry = new THREE.BufferGeometry();
			geometry.setAttribute('position', new THREE.Float32BufferAttribute([0,0,0,0,0,-1],3));
			geometry.setAttribute('color', new THREE.Float32BufferAttribute([0.5,0.5,0.5,0,0,0],3));
			const material = new THREE.LineBasicMaterial({vertexColors:true,blending:THREE.AdditiveBlending});
			return new THREE.Line(geometry,material);

		case 'gaze':
			const gaze_geometry = new THREE.RingGoemetry(0.02,0.04,32).translate(0,0,-1);
			const gaze_material = new THREE.MeshBesicMaterial({opacity:0.5,transparent:true});
			return new THREE.Mesh(gaze_geometry,gaze_material);
	}
}
getControllerGripは、TRHEE.Groupのオブジェクトを返し、コントローラーデバイスを設置するのに使います。
//右側のコントローラー
const controllerGrip1 = renderer.xr.getControllerGrip(0);
scene.add(controllerGrip1);

//左側のコントローラー
const controllerGrip2 = renderer.xr.getControllerGrip(1);
scene.add(controllerGrip2);
● XRControllerModelFactory.js
コントローラーデバイスは、ユーザーの環境に合わせて最適なものを設置してくれるXRControllerModelFactory.jsが、Three.jsにあります。XRControllerModelFactory.jsは「examples > jsm > webxr」にあり、使用するにはmotion-controllers.module.jsとGLTFLoader.jsが必要です
import { XRControllerModelFactory } from './lib/three_jsm/XRControllerModelFactory.js';

const controllerModelFactory = new XRControllerModelFactory();

//右側のコントローラー
const controllerGrip1 = renderer.xr.getControllerGrip(0);
controllerGrip1.add(controllerModelFactory.createControllerModel(controllerGrip1));
scene.add(controllerGrip1);

//左側のコントローラー
const controllerGrip2 = renderer.xr.getControllerGrip(1);
controllerGrip2.add(controllerModelFactory.createControllerModel(controllerGrip2));
scene.add(controllerGrip2);
● script.js
必要なライブラリを読み込みます。
<script src="js/preloadjs.min.js"></script>
<script src="js/TweenMax.min.js"></script>
<script src="js/script.js" type="module"></script>
完成したscript.jsになります。
//===============================================================
// Import Library
//===============================================================
import * as THREE from './lib/three_jsm/three.module.js';
import { VRButton } from './lib/three_jsm/VRButton.js';
import { XRControllerModelFactory } from './lib/three_jsm/XRControllerModelFactory.js';

//===============================================================
// Main
//===============================================================
window.addEventListener('load',function(){
   init();
});

let scene,camera,renderer;

function init(){
    scene = new THREE.Scene();
    camera = new THREE.PerspectiveCamera(50,window.innerWidth/window.innerHeight,0.1,100);
    camera.position.set(0,1.6,3);
    scene.add(camera);
    renderer = new THREE.WebGLRenderer({antialias:true});
    renderer.setPixelRatio(window.devicePixelRatio);
    renderer.setSize(window.innerWidth,window.innerHeight);
    renderer.physicallyCorrectLights = true;

    const container = document.querySelector('#canvas_vr');
    container.appendChild(renderer.domElement);

	document.body.appendChild(VRButton.createButton(renderer));

    window.addEventListener('resize',function(){
        camera.aspect = window.innerWidth/window.innerHeight;
        camera.updateProjectionMatrix();
        renderer.setSize(window.innerWidth,window.innerHeight);
    },false);

    checkDevice();
    setLoading();
}

function checkDevice(){
	if ('xr' in navigator) {
		navigator.xr.isSessionSupported('immersive-vr').then(function(supported){
			if(supported){
        		renderer.xr.enabled = true;
        		setVrControll();
			}
		});
	}
}

function setLoading(){
	TweenMax.to('.loader',0.1,{opacity:1});
	TweenMax.to('#loader_wrapper',1,{
        opacity:0,
        delay:1,
        onComplete: function(){
            document.getElementById('loader_wrapper').style.display ='none';
        }
    });
    threeWorld();
	setLight();
	rendering();
}

function threeWorld(){
		scene.background = new THREE.Color(0x505050);
		const gridHelper = new THREE.GridHelper(50,50);
		scene.add(gridHelper);
		renderer.outputEncoding = THREE.sRGBEncoding;
}

function setLight(){
	const directionalLight = new THREE.DirectionalLight(0XFFFFFF);
	directionalLight.position.set(0,4,0);
	scene.add(directionalLight);
}

function setVrControll(){
	const controller1 = renderer.xr.getController(0);
	controller1.name = 'RightController';
	controller1.addEventListener('selectstart',onSelectStart);
	controller1.addEventListener('selectend',onSelectEnd);
	controller1.addEventListener('connected',function(event){
		this.add(buildController(event.data));
	});
	scene.add(controller1);

	const controller2 = renderer.xr.getController(1);
	controller2.name = 'LeftController';
	controller2.addEventListener('selectstart',onSelectStart);
	controller2.addEventListener('selectend',onSelectEnd);
	controller2.addEventListener('connected',function(event){
		this.add(buildController(event.data));
	});
	scene.add(controller2);

	function onSelectStart(){
		console.log(this.name + 'の選択ボタンを押した');
	}
	function onSelectEnd(){
		console.log(this.name +'の選択ボタン離した');
	}

	const controllerModelFactory = new XRControllerModelFactory();

	const controllerGrip1 = renderer.xr.getControllerGrip(0);
	controllerGrip1.add(controllerModelFactory.createControllerModel(controllerGrip1));
	scene.add(controllerGrip1);

	const controllerGrip2 = renderer.xr.getControllerGrip(1);
	controllerGrip2.add(controllerModelFactory.createControllerModel(controllerGrip2));
	scene.add(controllerGrip2);

	function buildController(data){
		switch(data.targetRayMode){
			case 'tracked-pointer':
				const geometry = new THREE.BufferGeometry();
				geometry.setAttribute('position', new THREE.Float32BufferAttribute([0,0,0,0,0,-1],3));
				geometry.setAttribute('color', new THREE.Float32BufferAttribute([0.5,0.5,0.5,0,0,0],3));
				const material = new THREE.LineBasicMaterial({vertexColors:true,blending:THREE.AdditiveBlending});
				return new THREE.Line(geometry,material);

			case 'gaze':
				const gaze_geometry = new THREE.RingGoemetry(0.02,0.04,32).translate(0,0,-1);
				const gaze_material = new THREE.MeshBesicMaterial({opacity:0.5,transparent:true});
				return new THREE.Mesh(gaze_geometry,gaze_material);
		}
	}
}

function rendering(){
    renderer.setAnimationLoop(animate);
}

function animate(){
	renderer.render(scene,camera);
}

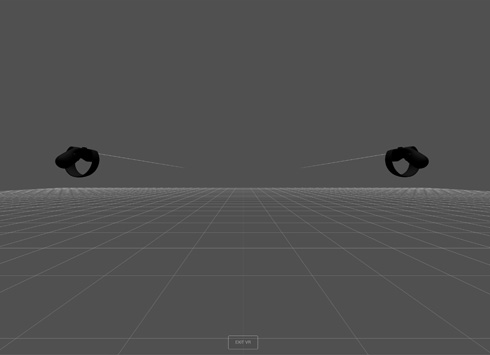
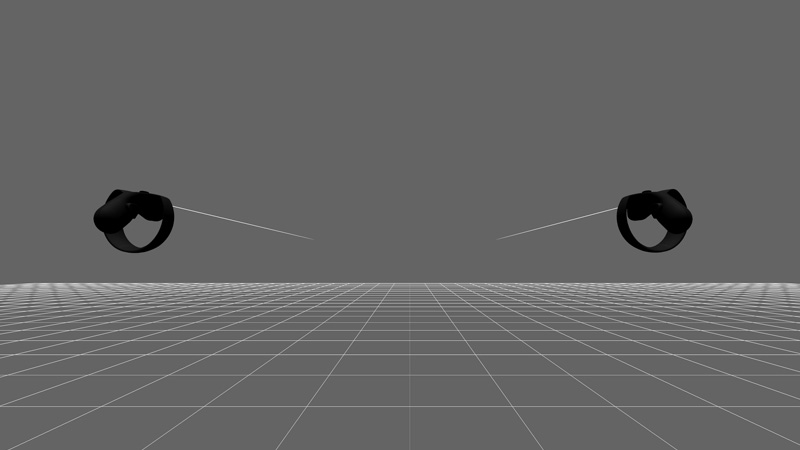
完成したデモになります。WebXR API Emulatorかヘッドマウントディスプレイで確認すると、コントローラーが表示されます。XRControllerModelFactory.jsを使用すると、自動的にそれぞれのデバイスに合ったコントローラーが表示されるので便利です!