Three.jsでロコモーション
WebVRコンテンツの空間を自由に移動したいと思い、Three.jsでロコモーションする方法を調べてみました。
Three.jsでロコモーション
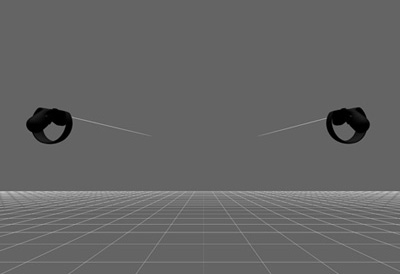
● コントローラーと光線を表示
「Three.jsでコントローラーを制御」で、Three.jsのWebXRManagerとXRControllerModelFactory.jsを使用して、コントローラーと光線を表示しました。
● ロコモーションについて
「Oculusドキュメント」によると、VRにおけるロコモーションとは、現実世界では静止した状態のまま仮想空間を移動することです。視覚的には空間を移動しているのに、身体は反対の感覚であるため、加速するとVR酔いなどの不快感を感じます。
そこで、「Using VR controllers and locomotion in THREE.js」を参考に、VR酔いしにくいテレボーテーションするタイプのロコモーションを実装します。
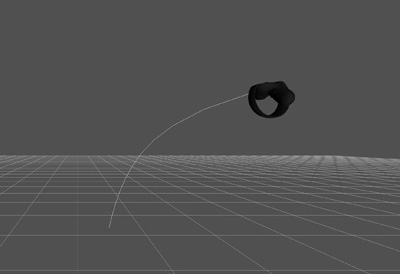
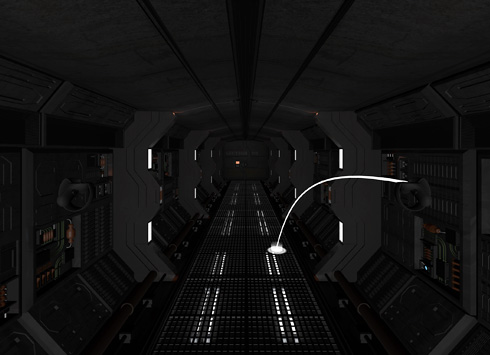
● ナビゲーションライン
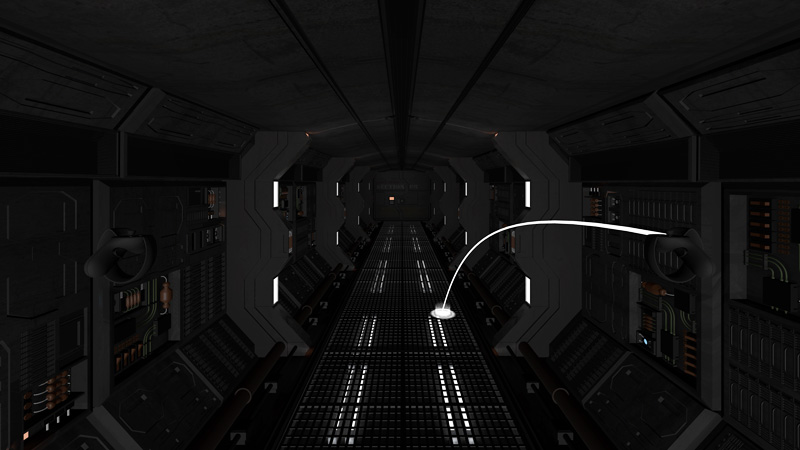
どの位置まで移動するかを指定するナビゲーションライン(光線)は、直線ではなく放物線のほうがスムーズに移動できると思ったので、VRアプリでもよく使われる放物線で実装します。
//コントローラー制御
let guidingController = null;
const controller1 = renderer.xr.getController(0);
controller1.addEventListener('selectstart',onSelectStart);
controller1.addEventListener('selectend',onSelectEnd);
scene.add(controller1);
function onSelectStart(event){
guidingController = this;
this.add(guideline);
}
function onSelectEnd(){
if(guidingController = this){
this.remove(guideline);
guidingController = null;
}
}
//ナビゲーションライン
const g = new THREE.Vector3(0,-9.8,0);
const tempVec = new THREE.Vector3();
const tempVec1 = new THREE.Vector3();
const tempVecP = new THREE.Vector3();
const tempVecV = new THREE.Vector3();
let lineGeometryVertices;
let guideline;
const lineSegments = 10;
//頂点座標を管理する配列
lineGeometryVertices = new Float32Array((lineSegments + 1) * 3);
lineGeometryVertices.fill(0);
//形状
const lineGeometry = new THREE.BufferGeometry();
lineGeometry.setAttribute('position',new THREE.BufferAttribute(lineGeometryVertices,3));
//マテリアル
const lineMaterial = new THREE.LineBasicMaterial({color:0xFFFFFF,blending:THREE.AdditiveBlending});
//ライン生成
guideline = new THREE.Line(lineGeometry,lineMaterial);
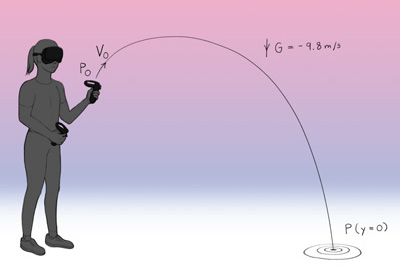
//座標の計算
function positionAtT(inVec,t,p,v,g){
inVec.copy(p);
inVec.addScaledVector(v,t);
inVec.addScaledVector(g,0.5*t**2);
return inVec;
}
//アニメーション
function animate(){
if(guidingController){
//放物線のシミュレーション
const p = guidingController.getWorldPosition(tempVecP);
const v = guidingController.getWorldDirection(tempVecV);
v.multiplyScalar(6);
const t = (-v.y + Math.sqrt(v.y**2-2*p.y*g.y))/g.y;
const vertex = tempVec.set(0,0,0);
for(let i=1; i<=lineSegments; i++){
positionAtT(vertex,i*t/lineSegments,p,v,g);
guidingController.worldToLocal(vertex);
vertex.toArray(lineGeometryVertices,i*3);
}
guideline.geometry.attributes.position.needsUpdate = true;
}
}
● ターゲットへ移動
ナビゲーションラインが地面に接する場所にターゲットを表示して、実際にターゲットまで移動します。

//カメラとコントローラーをcameraGroupに格納
let cameraGroup;
cameraGroup = new THREE.Group();
cameraGroup.add(camera);
cameraGroup.add(controller1);

//ターゲット生成
const guidespriteTexture = new THREE.TextureLoader().load('./img/target.png');
guidesprite = new THREE.Mesh(
	new THREE.PlaneGeometry(0.3,0.3,1,1),
	new THREE.MeshBasicMaterial({
		map:guidespriteTexture,
		blending:THREE.AdditiveBlending,
		color:0x555555,
		transparent:true
	})
);
guidesprite.rotation.x = -Math.PI/2;

function onSelectStart(event){
	guidingController = this;
	scene.add(guidesprite);
}

function onSelectEnd(){
	if(guidingController = this){

		//ターゲットまで移動
		const feetPos = renderer.xr.getCamera(camera).getWorldPosition(tempVec);
		feetPos.y = 0;

		const p = guidingController.getWorldPosition(tempVecP);
		const v = guidingController.getWorldDirection(tempVecV);
		v.multiplyScalar(6);
		const t = (-v.y + Math.sqrt(v.y**2-2*p.y*g.y))/g.y;
		const cursorPos = positionAtT(tempVec1,t,p,v,g);
		const offset = cursorPos.addScaledVector(feetPos,-1);
		locomotion(offset);

		scene.remove(guidesprite);
		guidingController = null;
	}

	function locomotion(offset){
		cameraGroup.position.add(offset);
	}
}

function animate(){
	if(guidingController){

		//ターゲットの配置座標の計算
		const p = guidingController.getWorldPosition(tempVecP);
		const v = guidingController.getWorldDirection(tempVecV);
		v.multiplyScalar(6);
		const t = (-v.y + Math.sqrt(v.y**2-2*p.y*g.y))/g.y;
		positionAtT(guidesprite.position,t*0.98,p,v,g);
		guidesprite.position.y = 0;
	}
}
● script.js
必要なライブラリを読み込みます。
<script src="js/preloadjs.min.js"></script>
<script src="js/TweenMax.min.js"></script>
<script src="js/script.js" type="module"></script>
完成したscript.jsになります。拡張性を考慮して、基本的な設定を管理するbasescene.jsとWebVR用のコントローラーを管理するvrcontroller.jsに分けました。また、ナビゲーションラインとターゲットのデザインをブラッシュアップしました。
//===============================================================
// Import Library
//===============================================================
import * as THREE from './lib/three_jsm/three.module.js';
import { OrbitControls } from './lib/three_jsm/OrbitControls.js';
import { GLTFLoader } from './lib/three_jsm/GLTFLoader.js';
import { scene, camera, cameraGroup, renderer } from './lib/basescene.js';
import * as VRCONTROLLER from './lib/vrcontroller.js';

//===============================================================
// Init
//===============================================================
window.addEventListener('load',function(){
   init();
});

let orbitControls;

function init(){
	checkDevice();
	setLoading();
}

function checkDevice(){
	if ('xr' in navigator) {
		navigator.xr.isSessionSupported('immersive-vr').then(function(supported){
			if(supported){
        		renderer.xr.enabled = true;
        		VRCONTROLLER.init();
			}else{
				setControll();
			}
		});
	}else{
		setControll();
	}
}

function setLoading(){
	TweenMax.to('.loader',0.1,{opacity:1});

    const gltfLoader = new GLTFLoader();
    gltfLoader.load('./data/space_corridor_webvr.glb',

    	function(gltf){
    		const obj = gltf.scene;
			obj.traverse(function(child) {
				if(child.isMesh){}
			});
			obj.position.set(0,1,0);
			scene.add(obj);

			TweenMax.to('#loader_wrapper',1,{
		        opacity:0,
		        delay:1,
		        onComplete: function(){
		            document.getElementById('loader_wrapper').style.display = 'none';
		            TweenMax.to('.loader',0,{opacity:0});
		        }
		    });

			threeWorld();
			setLight();
			rendering();
		});
}

//===============================================================
// Create World
//===============================================================
function threeWorld(){
	renderer.outputEncoding = THREE.sRGBEncoding;
}

function setLight(){
	const ambientlight = new THREE.AmbientLight(0x333333);
	scene.add(ambientlight);

	const pointLight = new THREE.PointLight(0xFFFFFF,10,30);
	pointLight.position.set(0,0,5);
	scene.add(pointLight);
}

function setControll(){
	document.addEventListener('touchmove',function(e){e.preventDefault();},{passive:false});
	orbitControls = new OrbitControls(camera,renderer.domElement);
	orbitControls.target.set(0,1.6,1);
	orbitControls.enableDamping = true;
	orbitControls.dampingFactor = 0.5;
	orbitControls.enableZoom = false;
}

function rendering(){
	renderer.setAnimationLoop(animate);
}

function animate(){
	VRCONTROLLER.animate();
	if(orbitControls){
		orbitControls.update();
	}
	renderer.render(scene,camera);
}
● basescene.js
sceneやcameraなど基本的な設定を管理するbasescene.jsです。
//===============================================================
// Import Library
//===============================================================
import * as THREE from './three_jsm/three.module.js';
import { VRButton } from './three_jsm/VRButton.js';

//===============================================================
// Base scene
//===============================================================
let scene,camera,cameraGroup,renderer;

init();

function init(){
	scene = new THREE.Scene();
	camera = new THREE.PerspectiveCamera(80,window.innerWidth/window.innerHeight,0.1,100);
	camera.position.set(0,1.6,1);
	cameraGroup = new THREE.Group();
	cameraGroup.add(camera);
	scene.add(cameraGroup);

	renderer = new THREE.WebGLRenderer({antialias:true});
	renderer.setPixelRatio(window.devicePixelRatio);
	renderer.setSize(window.innerWidth,window.innerHeight);
	renderer.setClearColor(new THREE.Color(0x000000));
	renderer.physicallyCorrectLights = true;
	renderer.outputEncoding = THREE.sRGBEncoding;

	const container = document.querySelector('#canvas_vr');
	container.appendChild(renderer.domElement);

	document.body.appendChild(VRButton.createButton(renderer));

	window.addEventListener('resize',function(){
		camera.aspect = window.innerWidth/window.innerHeight;
		camera.updateProjectionMatrix();
		renderer.setSize(window.innerWidth,window.innerHeight);
	},false);
}

export { scene, camera, cameraGroup, renderer }
● vrcontroller.js
ナビゲーションラインはTHREE.MeshLineを使用して線の太さを調整しました。
//===============================================================
// Import Library
//===============================================================
import * as THREE from './three_jsm/three.module.js';
import { XRControllerModelFactory } from './three_jsm/XRControllerModelFactory.js';
import { scene, camera, cameraGroup, renderer } from './basescene.js';
import MeshLine from './three_jsm/meshline/MeshLine.js';
import MeshLineMaterial from './three_jsm/meshline/MeshLineMaterial.js';

//===============================================================
// Variable
//===============================================================
let guidingController = null;

const g = new THREE.Vector3(0,-9.8,0);
const tempVec = new THREE.Vector3();
const tempVec1 = new THREE.Vector3();
const tempVecP = new THREE.Vector3();
const tempVecV = new THREE.Vector3();

const lineSegments = 30;
let angle = 0;
let lineGeometryVertices;
let meshLine,guideline,guidesprite;

//===============================================================
// VR Controller
//===============================================================
function init(){
	setGuidesline();

	const controller1 = renderer.xr.getController(0);
	controller1.addEventListener('selectstart',onSelectStart);
	controller1.addEventListener('selectend',onSelectEnd);
	scene.add(controller1);
	cameraGroup.add(controller1);

	const controller2 = renderer.xr.getController(1);
	controller2.addEventListener('selectstart',onSelectStart);
	controller2.addEventListener('selectend',onSelectEnd);
	scene.add(controller2);
	cameraGroup.add(controller2);

	function onSelectStart(event){
		guidingController = this;
		this.add(guideline);
		scene.add(guidesprite);
	}

	function onSelectEnd(){
		if(guidingController = this){
			const feetPos = renderer.xr.getCamera(camera).getWorldPosition(tempVec);
			feetPos.y = 0;

			const p = guidingController.getWorldPosition(tempVecP);
			const v = guidingController.getWorldDirection(tempVecV);
			v.multiplyScalar(6);
			const t = (-v.y + Math.sqrt(v.y**2-2*p.y*g.y))/g.y;
			const cursorPos = positionAtT(tempVec1,t,p,v,g);

			const offset = cursorPos.addScaledVector(feetPos,-1);
			locomotion(offset);

			this.remove(guideline);
			scene.remove(guidesprite);
			guidingController = null;
		}

		function locomotion(offset){
			cameraGroup.position.add(offset);
		}
	}

	const controllerModelFactory = new XRControllerModelFactory();

	const controllerGrip1 = renderer.xr.getControllerGrip(0);
	const model1 = controllerModelFactory.createControllerModel(controllerGrip1);
	controllerGrip1.add(model1);
	scene.add(controllerGrip1);
	cameraGroup.add(controllerGrip1);

	const controllerGrip2 = renderer.xr.getControllerGrip(1);
	const model2 = controllerModelFactory.createControllerModel(controllerGrip2);
	controllerGrip2.add(model2);
	scene.add(controllerGrip2);
	cameraGroup.add(controllerGrip2);
}

function setGuidesline(){
	lineGeometryVertices = new Float32Array((lineSegments+1)*3);
	lineGeometryVertices.fill(0);

	const lineGeometry = new THREE.BufferGeometry();
	lineGeometry.setAttribute('position',new THREE.BufferAttribute(lineGeometryVertices,3).setUsage(THREE.DynamicDrawUsage));

	meshLine = new MeshLine();
	meshLine.setGeometry(lineGeometry);
	const lineMaterial = new MeshLineMaterial({
    	lineWidth:0.005,
	});

	guideline = new THREE.Mesh(meshLine.geometry,lineMaterial);
	scene.add(guideline);

	guidesprite = new THREE.Group();
	let texture = new THREE.TextureLoader().load('./img/vrcontroller/pillar.png');
	let geometry = new THREE.CylinderGeometry(0.09,0.09,0.1,20,20,true);
	let material = new THREE.MeshBasicMaterial({
		map:texture,
		color:0xFFFFFF,
		transparent:true,
		opacity:0.45,
		blending: THREE.AdditiveBlending,
		side:THREE.DoubleSide,
		depthWrite:false
	});
	const pillar = new THREE.Mesh(geometry,material);
	pillar.position.y = 0.075;
	guidesprite.add(pillar);

	texture = new THREE.TextureLoader().load('./img/vrcontroller/ground.png');
	geometry = new THREE.PlaneGeometry(0.3,0.3,16,16);
	material = new THREE.MeshBasicMaterial({
		map:texture,
		color:0xFFFFFF,
		transparent:true,
		opacity:0.8,
		blending: THREE.AdditiveBlending,
		side:THREE.DoubleSide
	});

	const ground = new THREE.Mesh(geometry,material);
	ground.scale.multiplyScalar(1.1);
	ground.rotation.x = Math.PI/2;
	ground.position.y = 0.01;
	guidesprite.add(ground);
}

function positionAtT(inVec,t,p,v,g){
	inVec.copy(p);
	inVec.addScaledVector(v,t);
	inVec.addScaledVector(g,0.5*t**2);
	return inVec;
}

function animate(){
	if(guidingController){
		const p = guidingController.getWorldPosition(tempVecP);
		const v = guidingController.getWorldDirection(tempVecV);
		v.multiplyScalar(6);
		const t = (-v.y + Math.sqrt(v.y**2-2*p.y*g.y))/g.y;
		const vertex = tempVec.set(0,0,0);

		let lineGeometryVertices = guideline.geometry.attributes.position.array;

		for(let i=1; i<=lineSegments; i++){
			positionAtT(vertex,i*t/lineSegments,p,v,g);
			guidingController.worldToLocal(vertex);
			vertex.toArray(lineGeometryVertices,i*3);
		}

		lineGeometryVertices = lineGeometryVertices.slice(0,(lineSegments+1)*3);
		guideline.geometry.setAttribute('position',new THREE.BufferAttribute(lineGeometryVertices,3).setUsage(THREE.DynamicDrawUsage));
		meshLine.setGeometry(guideline.geometry);
		guideline.geometry.attributes.position.needsUpdate = true;

		positionAtT(guidesprite.position,t*0.98,p,v,g);
		guidesprite.position.y = 0;
	}
}

export { init , animate }

完成したデモになります。WebXR API Emulatorかヘッドマウントディスプレイで確認すると、WebVRコンテンツの空間を自由に移動することができます。